
Setting Goals and Targets for your Campaign
Using Bench Connect’s Goal management system will enable you to track and measure the performance of your campaign against predetermined benchmarks. All reporting dashboards are configured to report against the goals defined in the ‘Goals’ tab within your Campaign.
Advertiser Pixels
If you intend to set either your Campaign Goal or your Media Type Goals to track a pixel-based conversion, you’ll first need to define this Advertiser Pixel on the ‘Goals’ tab within your Campaign.
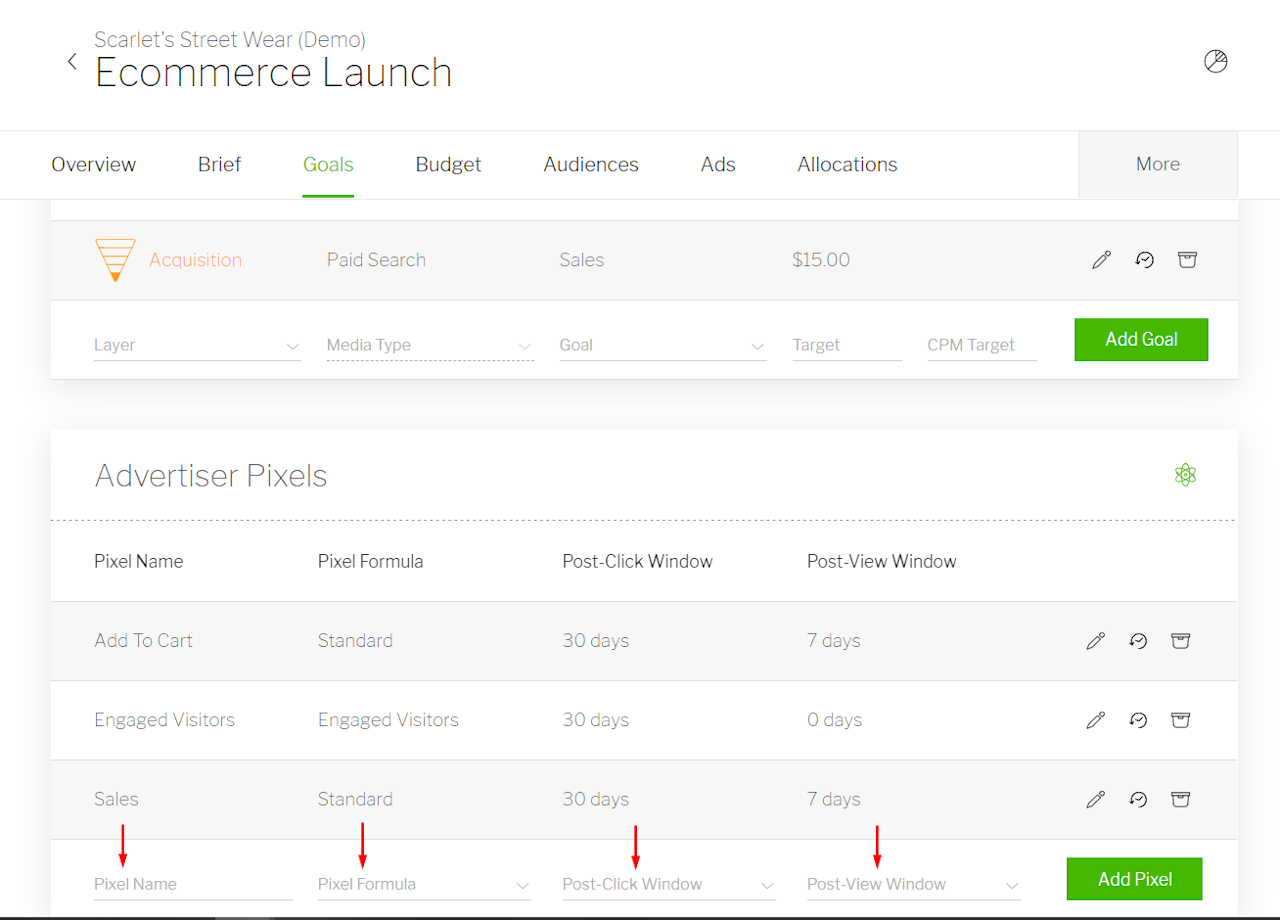
To define your Advertiser Pixels, navigate to the bottom of the ‘Goals’ page. If no prior Advertiser Pixels have been defined for this Advertiser (Advertiser pixels are persistent across all Campaigns within each Advertiser), this section will be blank.
Under the ‘Advertiser Pixels’ section, first, define your Pixel Name. This name will appear in all Bench reporting interfaces so should best reflect the conversion point that is being tracked on a website or app (e.g. ‘Sales’).
Next, select the Pixel Formula that defines how this pixel is being tracked and the data will be matched to Bench.
In most cases, this will be set to ‘Standard’ which should be used across most ad platforms & DSPs as well as Custom Conversions in Meta Ads Manager. Setting this formula means the platform will look to match data to the defined 'Pixel Name' or the Bench naming convention for the pixel. The latter can be accessed through the trafficking doc for the allocation or by clicking on the pixel name which will copy it to the clipboard after creation.
For other conversion types, in particular Standard Events from Meta Ads Manager, use the corresponding pixel formula. Setting these formulas means the platform will look to match data to the pixel formula name rather than the pixel name. These pixel formulas can be used with other platforms as well but bear in mind that the pixel name in the ad platform/DSP should exactly match the pixel formula name.
Some of the other formulas available are below:
a. ‘Event Responses’ - select if the ‘Event Responses’ metric on Facebook should be included in the tracking for this pixel.
b. ‘Leads’ - select if the ‘Leads’ metric on Meta (commonly used to track Lead Ads) should be included in the tracking for this pixel.
c. ‘Mobile App Installs’ - select if the ‘Mobile App Install’ metric on Meta should be included in the tracking for this pixel.
d. ‘Purchase’ - select if the ‘Purchase’ metric on Meta should be included in the tracking for this pixel as well as any associated pixels. This is commonly used to track both Web and App events that are mapped to the ‘Purchase’ metric in Meta.
Select both your Post-Click and Post-View Window values that are to be used for this pixel conversion.
Click ‘Add Pixel’ to save your Advertiser Pixel. Once saved this can be used as a Campaign or Media Type Goal across any other Campaign that is associated with this Advertiser.
Campaign Goal
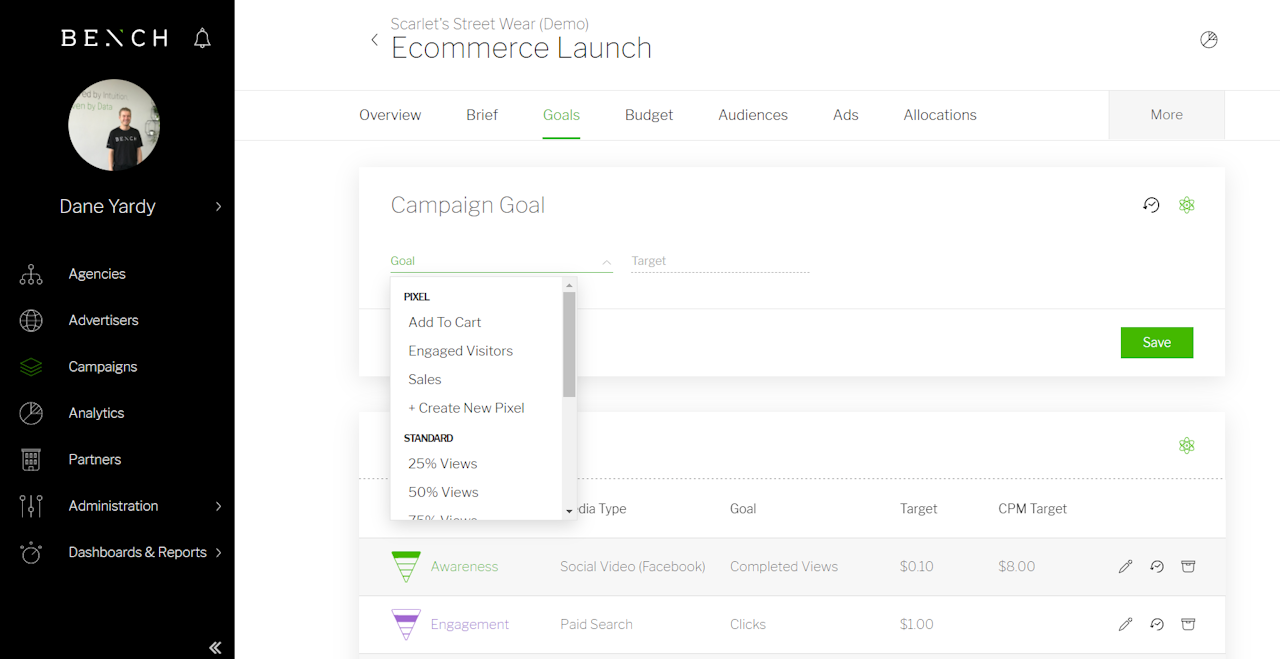
To set your Campaign Goal, navigate to the ‘Goals’ tab within your Campaign.
From the dropdown, select either one of the pre-determined ‘Standard’ metrics (e.g. Impressions or Video Views) or one of the custom Advertiser Pixel metrics (see 'Advertiser Pixels' above for steps on how to create these).
Optional - Enter a target cost-per-acquisition value to track against your Campaign Goal. Leave this value blank if you’d like to simply track the number of Campaign Goal Conversions and not measure it against a CPA target.
Media Type Goals
For each Media Type within each Layer that is activated through Bench Connect, a Media Type Goal should be assigned. The selected Goal and Target will be used to populate all reporting and KPI tracking interfaces within the platform.
To set your Media Type Goals, navigate to the ‘Goals’ tab within your Campaign.
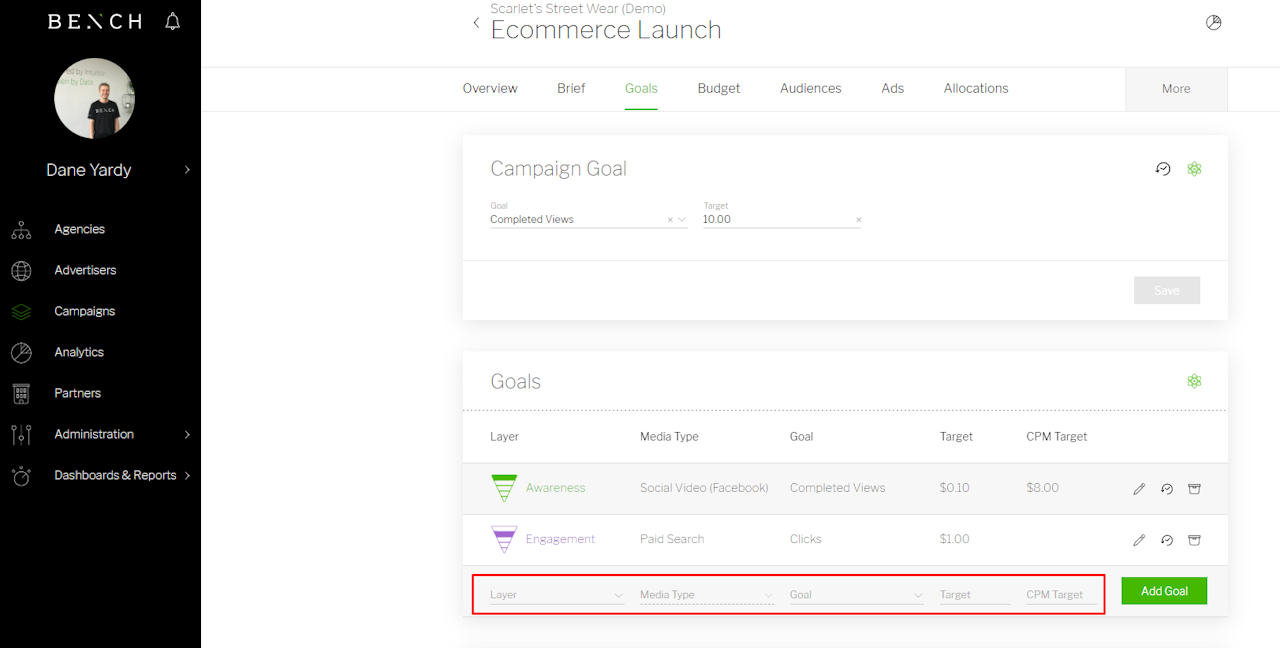
Under the ‘Goals’ section of the page, first, select the Layer that your Media Type is being activated within.
Next, select your Media Type from the dropdown list. If you have already created an Allocation for a specific Media Type and Layer combination, it will be shown under the ‘Active Media Types’ section of this list. Any Media Types that fall under the ‘Inactive’ section, do not have an associated Allocation and will need one created before this goal can be successfully tracked.
Select the Goal that this Layer and Media Type combination should track. Either one of the pre-determined ‘Standard’ metrics (e.g. Impressions or Video Views) or one of the Advertiser Pixel metrics (see ‘Advertiser Pixels’ above) can be selected.
With your Goal selected, enter a target cost-per-acquisition value to track against this specific Media Type Goal (for example, for your ‘Completed Views' Goal, a target of $0.10 Cost-Per-Completed View is to be set and tracked in reporting).
Optional - Enter a target CPM value to track against this Media Type and Layer. Leave this value blank if you’d like to refrain from tracking a specific CPM target.
Once you’re happy with your selections, click ‘Add Goal’.
Repeat the above steps for every Layer and Media Type combination you plan to activate within your campaign.
Goal selections or targets can be modified or archived at any time however its recommended that this be done before a campaign goes live to ensure consistent reporting.


